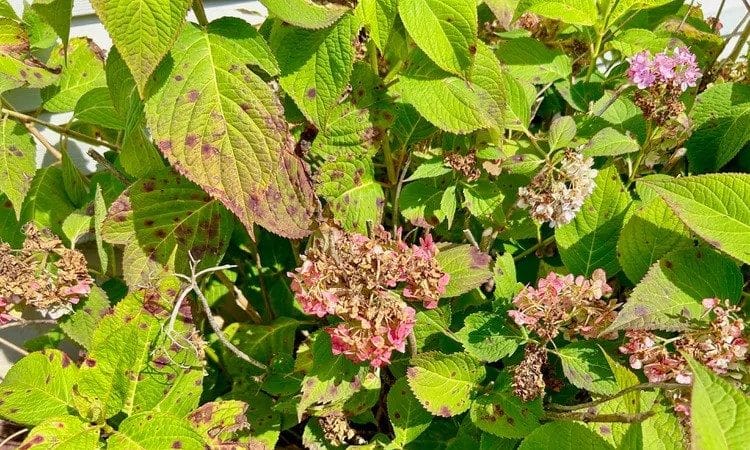
How to Fix and Prevent Brown Spots on Hydrangeas
Don’t fret, those brown spots on your hydrangea leaves and flowers are not a cause for immediate concern. They’re usually nothing more than harmless blemishes, but they might mean that your plants are facing a few challenges. If your hydrangeas have started to look a bit spotty, don’t panic! We’ve got your back with a few simple tricks to help you identify the cause and treat your plants so they’re healthy and looking their best.
5 Causes of Brown Spots on Hydrangea Leaves
Although brown spotting on hydrangeas is relatively common, it can make hydrangeas look bedraggled and reduce flowering over time. The good news is that hydrangea spots can usually be fixed. But first, you’ll need to identify exactly what’s causing those spots to begin with.
Disease
Cercospora leaf spot, rust, and other fungal and bacterial plant diseases are the most common causes of hydrangea leaf spots. These diseases typically crop up in warm and humid conditions with poor air flow, and they’re more likely to occur after heavy rainfall or with overhead watering. Leaf spot is particularly common in hydrangeas, causing purplish spots with gray or tan centers that start on the older, lower leaves and work their way up the plant.
Sun Damage
Some hydrangeas tolerate full sun, but most grow best with morning sun and a bit of afternoon shade. When hydrangeas are grown in exposed areas in hot climates, they can develop leaf scorch or sunburn, which primarily affects the upper plant leaves and may cause leaf bleaching, brown and crispy leaf patches, and leaf drop.
Water Stress
While hydrangeas love moist soil, plants can develop root rot in waterlogged gardens with poor drainage and lots of heavy clay. When this occurs, hydrangea roots start to die, and the plant’s leaves may wilt and develop dark splotches.
Cold Temperatures
Choosing the right hydrangea varieties for your specific growing zone will help you avoid temperature-stressed plants. However, if an unexpected cold snap occurs late in spring, newly sprouted hydrangea leaves may sustain damage and turn brown.
Pests
Four-lined plant bugs and other sap-sucking insects can leave behind clusters of tiny brown spots at feeding sites on hydrangea leaves. You may encounter the insects themselves, or you may just see their brown feeding spots and find sticky “honeydew” residue on affected plant leaves.
3 Ways to Fix Brown Spots on Leaves
Hydrangea leaves that turn brown won’t turn green again. But there are a few ways to keep brown spots from spreading and improve the look of your hydrangeas.
Pruning
If your hydrangeas are suffering from diseases or pests, prune away and destroy badly-infested leaves to contain the problem. Many plant diseases and pests can survive the composting process, so it’s best to burn infested plant material or bag it and throw it in the trash.
Watering
If hydrangeas have developed root rot due to waterlogged soil, reduce watering and allow the soil to dry out before watering again. You may also want to amend your soil with compost or other organic matter to improve drainage, reduce soil compaction, and eliminate soggy spots.
Pest Control
If pests are plaguing your plants, hand-pick larger insects into a bucket of soapy water and then spray the affected plant leaves with an organic insecticidal soap spray. You may need to repeat this treatment several times at 7 to 10-day intervals to tackle adult insects, as well as their nymphs and eggs.
7 Ways to Prevent Brown Spots from Appearing Again
Brown spots on hydrangeas can reoccur if you don’t address the issues that caused them in the first place. Here are a few simple ways to keep your hydrangea plants spot-free in the future.
Sanitation
To keep pests and diseases from reoccurring year after year, prune away and destroy infected plant material in the fall.
Spacing
Ensuring hydrangeas have good airflow is one of the best ways to prevent fungal issues like Cercospora. Most hydrangeas do well with 3 to 5-foot spacing.
Watering
Hydrangeas need about 1 inch of water per week. To keep plant leaves dry, swap out your sprinkler for a drip irrigation system, or hand water your plants by directing your hose straight at the soil line.
Organic Fungicides
Fungicides can be handy if fungal issues affect your hydrangeas every year. These products are preventatives, not treatments, and they work best if you apply them every 10 to 14 days from spring through fall.
Resistant Varieties
If you’re planting a new garden or adding more hydrangeas to your space, look for hydrangea varieties that are resistant to fungal issues.
Companion Planting
Attracting beneficial bugs into your garden with flowering plants can keep your hydrangeas naturally pest-free. Try plants like dill, yarrow, and goldenrod to attract “good guy” insects, such as pirate bugs.
Add Mulch
A 2 to 3-inch layer of mulch over the soil can keep water and fungal spores from splashing up on hydrangea leaves and causing fungal issues.
Additional Tips for Beautiful Hydrangeas
Healthy hydrangeas grow faster and produce more flowers. But they’re also more efficient at resisting plant diseases and pests. Here are a few more hydrangea growing tips to keep your hydrangeas looking their best:
- Choose the right hydrangea varieties for your garden. Oakleaf hydrangeas are known to be drought-resistant, while panicle hydrangeas are especially cold-tolerant.
- Fertilize regularly. All types of hydrangeas should be fertilized at least once a year in late winter to early spring with a balanced, slow-release, organic fertilizer.
- Know how to prune. Hydrangeas that flower on new wood should be pruned when the plants are dormant in late winter to early spring. However, hydrangeas that bloom on old wood should only be pruned immediately after they flower.
By following these tips and techniques, you can maintain healthy and vibrant hydrangeas, ensuring they remain a beautiful addition to your garden.

